
Pier Foundations provides ground improvement made simple. Learn how our innovative approach can save you time and money compared to the alternatives.
A lot of the time, the answer is “not yet.” The soil under a commercial site is often too soft, too loose, or too compressible to carry a building without settling unevenly over time. When soil settles unevenly, floors crack, doors stick, and structures fail. That’s a problem no owner wants to inherit.
Pier Foundations solves that problem before the building ever goes up. We’re a ground improvement contractor. We go in early, reinforce and stiffen the weak soil, and turn a site that couldn’t support a conventional foundation into one that can.
Here’s why that matters to your schedule and your budget. There are two traditional ways to deal with weak or compressible soil, and both come at a cost.
The first is a deep foundation, meaning driven piles or drilled shafts that reach all the way down to firm rock or hard soil far below the surface. Deep foundations work, but they’re expensive, they take time, and they often require the structural engineer to redesign the building around them.
The second is over excavation. This is the old standby: dig out all the bad soil and haul it off, then bring in engineered, structural fill and compact it back in carefully placed layers, or “lifts,” until you’ve rebuilt the site with good material. It sounds simple, but it gets heavy fast. The deeper the bad soil goes, the bigger and more open the excavation has to be, which means more digging, heaps of spoils to truck away and dispose of, and loads of imported fill hauled in to replace it. That’s a lot of truck traffic, a lot of site disruption, and a lot of cost. A wide-open hole is also exposed to the weather and to groundwater, so rain and dewatering can stall the work and turn good fill into mud.
Ground improvement takes a different path. Instead of digging the weak soil out or bypassing it, we improve it right where it sits. Compared to over-excavation and backfill, the advantages are easy to see: far less excavation and far fewer spoils to haul off and dispose of, little to no imported fill, and much less truck traffic and disruption on your site. We reach the depth the design needs without opening up a massive excavation, so there’s far less exposure to weather and dewatering headaches. It’s typically faster and lower cost on top of all that. And once we’re done, the structure can sit on ordinary shallow footings, the same simple, economical foundations you’d use on good ground in the first place.
The result is a foundation solution that’s typically faster to install and more economical than either going deep or digging it all out, and that lets the building team keep the design they already have.
If you’ve researched ground improvement, you’ve probably run into a wall of trade names: aggregate piers, stone columns, vibro piers, and several brand names on top of those. It’s confusing, and it’s meant to sound like a dozen different things.
Here’s the truth, and it’s worth holding onto: A stone column is a stone column, no matter what it’s called.
An aggregate pier and a vibratory stone column are the same ground improvement element. Both are a tall, dense column of compacted stone built down into the soil. The trade names differ and the installation tool can differ, but the engineering and the finished product are the same thing: a stiff, strong column of crushed stone that reinforces the soil around it. Don’t get lost in the marketing. Pier Foundations installs these columns using a tool called a vibroflot.
A vibroflot is a long, heavy vibrating probe that hangs from our rig. Picture a powerful steel tube, several feet of it, that shakes side to side with real force. Here’s how it turns soft ground into a strong column, step by step:
Where harder material or obstructions are present, the location is predrilled first to clear the path for the probe.
The vibroflot vibrates its way straight down into the soil, pushing the weak soil aside as it goes, until it reaches the design depth.
Crushed stone is fed down to the bottom of the hole the probe created.
The probe pulls up a short distance, then drives back down, packing that stone tight and forcing it outward against the surrounding soil. Then it does it again, a little higher, and again, building the column from the bottom up one compacted layer, or "lift," at a time.
When it's finished, there's a dense, strong column of stone running through what used to be weak ground.
The effect is twofold. The columns themselves are strong and carry much of the building’s load. And the act of building them squeezes and stiffens the surrounding soil, so the whole improved zone, columns and soil together, behaves like much better ground than what you started with. Engineers sometimes describe the result as a “bed of springs” working together to support the structure.
The stone we use is durable, well-graded crushed rock, the same kind of hard, angular stone that locks together tightly under pressure and won’t break down over time.
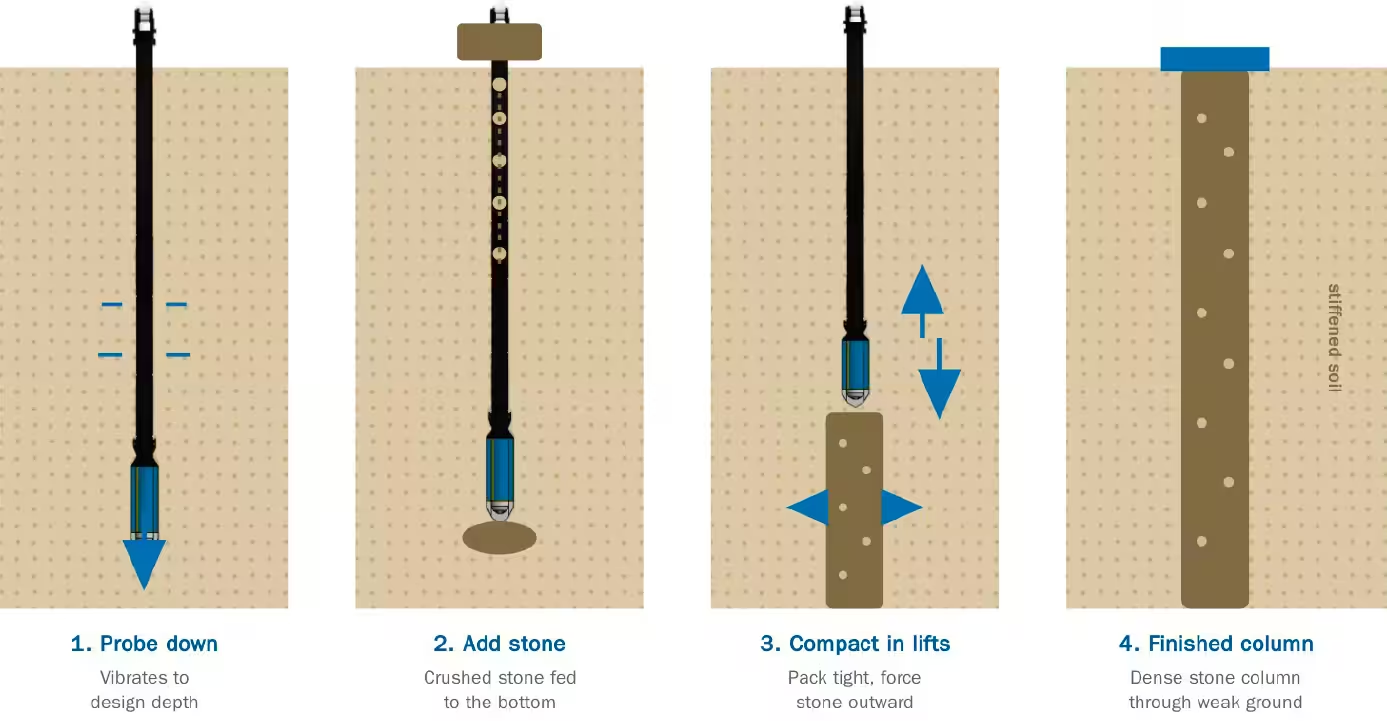
The vibroflot penetrates to depth, then builds a compacted stone column from the bottom up, stiffening the soil around it.
A ground improvement job runs in a clear sequence. Here’s the whole path, from the first set of drawings to the final closeout package.
Every project starts with design. Our engineer of record reviews the geotechnical report and the structural plans and designs a column layout, meaning the diameter, depth, and spacing of the stone columns,tailored to your soils and your building.
This is also where we ask for something that surprises some people: your structural engineer’s unfactored service loads, the actual Dead Load and Live Load on each footing. We explain the “why” in detail in the FAQ section, but the short version is this: our design is controlled by settlement, not just strength. We’re sizing the system to keep the building from settling more than it’s allowed to, and you can only calculate settlement from the real loads. A bearing capacity number alone isn’t enough.
Once the design is done, it goes through the normal submittal process. We package the design and send it to the project’s submittal manager for review by the design team. They review, we respond to any comments, and the design gets approved for construction. We track every date so nothing sits.
Before our crew can mobilize, the site has to be ready for us. This is work the general contractor handles, and it’s straightforward:
Our rig is heavy, roughly 120,000 pounds, so we need a building pad that's been proof-rolled and will support the equipment without rutting or bogging down. Depending on the season, ideally the pad is stoned as well, which minimizes mud tracked across the site and reduces down days from rain events.
The pad needs to be at the right elevation, within about 3 inches of plan grade, when we install.
A way for our equipment and material trucks to get to and around the work area.
Some installation methods bring soil up out of the ground, and any underground obstructions need to be dealt with so we can work.
When the pad is ready, we’re ready. A good pad is the single biggest thing that keeps a ground improvement job on schedule.
We bring our rig, our vibroflot, and our support equipment to the site, walk the job with your team, and start installing. Working from the approved layout, we build the stone columns one at a time across the building footprint. Where harder material or obstructions call for it, a location is predrilled first. We track progress closely throughout, so you always know exactly where the job stands.
Quality control isn’t a step at the end, it runs the whole time. As we build each column, we log the installation data: depth, the pressure on the vibroflot, the volume of stone going in, and the rate of advance and withdrawal. In a real sense, every single column is its own test, because the installation data tells us the column was built right.
On top of that continuous logging, we perform modulus load testing, a direct test that loads representative columns and confirms they perform to the design. The combination, full logging on every column plus load testing, is how we prove the ground is improved.
When installation is complete, we compile the record. Our engineer produces the as-built drawings documenting what was installed and where, we check them against our field logs, and we deliver the closeout package, including the column logs, to your team. You finish the project with a complete, documented record of the improved ground under your building.

If you’ve got a site with questionable soils, the earliest conversation is the most valuable one. Send us the geotechnical report and the structural plans, and we’ll tell you honestly whether ground improvement is the right call, and what it would take.